
With Windows 10 end of support coming up, it’s a good time to start migrating user devices over to Windows 11. How best to make the move from Windows 10 to Windows 11 depends on the size, diversity, and requirements of your endpoint environment. We’ll walk you through three common tools that you can use — Microsoft Intune, disk cloning software, and file-based computer imaging software (like SmartDeploy) — and key considerations of each approach.
Upgrading devices to Windows 11 with Microsoft Intune
If you have user devices enrolled in Microsoft Intune, you can perform in-place Windows 11 upgrades via the Microsoft Intune admin center. This involves creating a Windows 11 feature update policy, configuring your settings, and applying the policy to target Windows 10 device groups.
Considerations when using Microsoft Intune
If Intune is already part of your device management stack, using it to move user machines to Windows 11 is not difficult. But with Intune, you don’t get as much granular control when configuring your Windows 11 update. You can set Windows 11 updates to roll out as soon as they’re available or on a specific date — but not at a specific time.
Admins also don’t get a ton of visibility throughout the process. You don’t know exactly when the Windows 11 update gets pushed or to which user devices. And you won’t know immediately if any issues crop up along the way.
Unlike a clean install of Windows 11, an in-place Windows 11 upgrade moves a Windows 10 PC to the new operating system with their settings and user data intact. And here’s the thing: user devices that have been in use for some time come with baggage installed (like the emotional scars of a bad breakup), which can cause unpredictable results during or after the transition.
If you have trust issues (like most of us in IT do), you might prefer to start off user devices on a clean slate. And that means applying a clean Windows 11 operating system image to your Windows 10 machines.
Reimaging Windows 10 PCs with disk cloning software
For clean installs of Windows 11, one option is to use disk cloning software, like Clonezilla or Symantec Ghost. With disk cloning software, you create an exact copy of a reference computer with Windows 11 installed, including its hard drive and all its contents — and apply the golden image to your target devices. Here’s what a typical disk cloning process looks like:
1. Create a physical reference computer
Download the Windows 11 ISO and install it on your reference computer along with the latest Windows updates, hardware drivers, and applications you need. Make sure you give yourself enough time to search for and download all the device drivers and apps (which we all know is a true test of character). Use Sysprep to generalize the reference computer before capturing your Windows 11 image.
2. Capture and deploy your Windows 11 image
Because cloned images are exact copies of the reference computer, you’d want to deploy them to identical or closely compatible devices for the best results.
3. Configure user devices manually
After deploying Windows 11 to the target machine, you’d have to manually install Windows updates or custom apps not included in your golden image before tackling device configuration tasks (e.g., domain joins and network mapping) on each machine. Multiplied by the number of Windows 10 PCs you need to move and that’s hours of your life you’ll never get back.
Considerations when using disk cloning software
If you’re moving a bunch of identical devices to Windows 11, using disk cloning software can be a convenient (if somewhat laborious) option.
But for environments with diverse hardware, the disk cloning approach gets less scalable since you ideally need one image for each computer make and model — and one physical reference computer per image you need to create. You might even need to clear out your team stash of caffeinated beverages to make space (whelp).
And because disk cloning software uses sector-based (instead of file-based) imaging, it can be harder to customize the image deployment process, including actions like slipstreaming custom apps with your Windows 11 image.
This is where file-based computer imaging software comes in.
Reimaging Windows 10 PCs with file-based computer imaging software
When it comes to reimaging your Windows PCs, file-based computer imaging software gives you more flexibility than sector-based disk cloning tools. SmartDeploy allows you to create hardware-independent Windows 11 images that can be deployed to any Windows 10 PC. And unlike cloned disk images, they’re easier to modify and you can slipstream device drivers, apps, and user data in the same deployment. Here’s how.
Reference computers for Windows imaging
Reference computers used in computer imaging can be physical devices or virtual machines. In general, virtual machines are easier to update and save you time, space, and money.
SmartDeploy’s computer imaging solution supports virtual machines created with the following virtualization platforms:
VMWare Workstation Pro/Workstation/Player
Microsoft Hyper-V (a feature you can enable on any Windows 10 or Windows 11 OS)
Bare metal hypervisors like Citrix, XenServer, and VMWare ESX
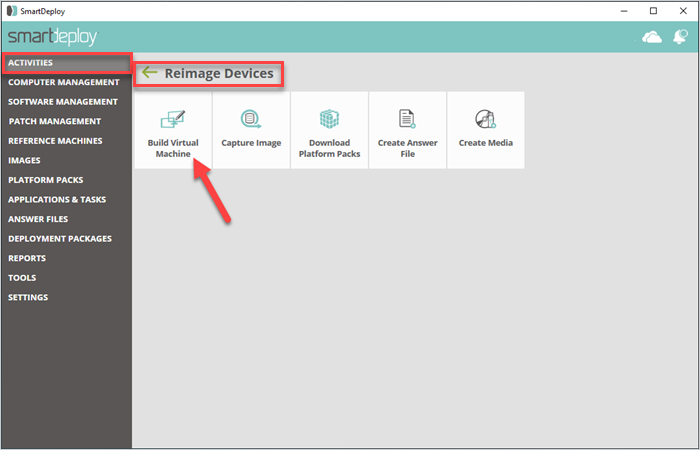
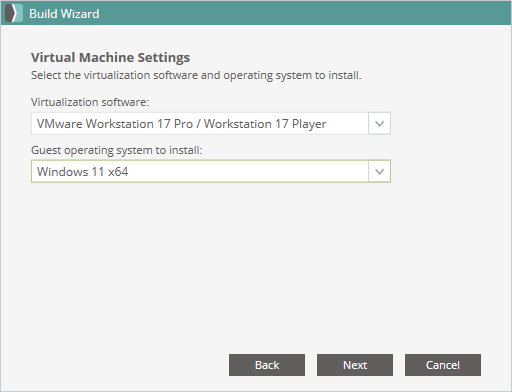
1. Create your reference computer
Launch SmartDeploy.
Go to Activities > Reimage Devices > Build Virtual Machine to launch the Build Wizard (works with Oracle VM VirtualBox and VMWare).
Follow the steps to select your Windows 11 ISO file and check your virtual machine settings.
When you’re done, click Finish.
2. Install Windows 11 on your reference computer
Power on your reference computer.
Install Windows 11 and run Windows updates. (You don’t need to run Sysprep. SmartDeploy runs Sysprep automatically at deployment time.)
Install any core applications that apply to all target machines.
When ready, power down your reference computer.
Golden image best practices
When capturing your Windows 11 golden image, always make sure it’s fully patched and up to date; leave out antivirus software or other third-party security applications as well as user or machine-specific data; and always run a test or two before deploying.
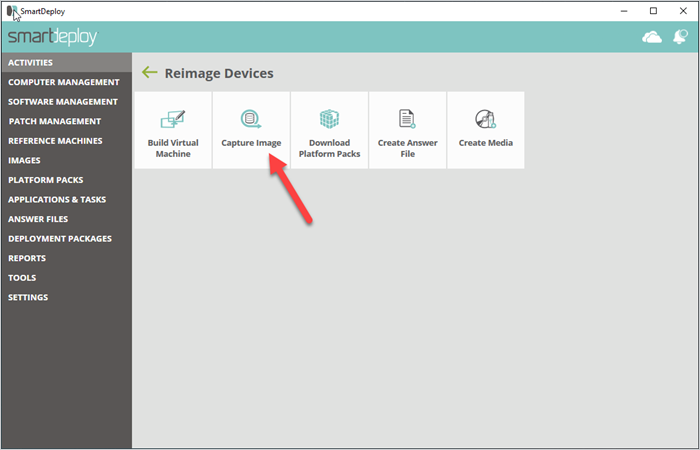
3. Capture your Windows 11 operating system image
From the SmartDeploy console, go to Activities > Reimage Devices > Capture Image.
Via the Capture Wizard, select and scan your Windows 11 virtual hard disk.
Choose a name and location for your .WIM file.
Click Finish to build your .WIM file.
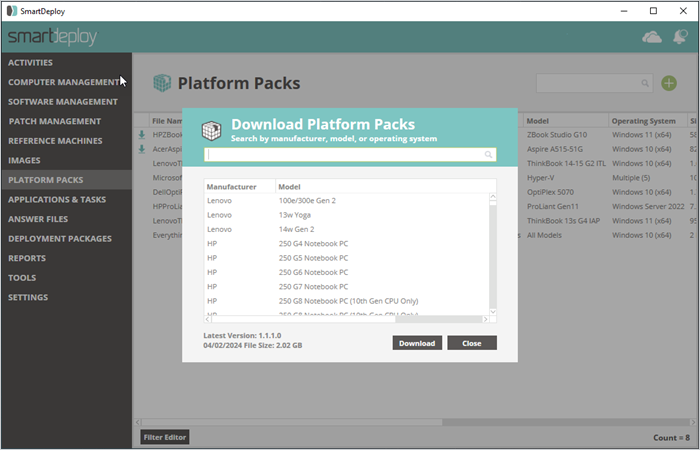
4. Download driver packs
Download model-specific driver packages (or Platform Packs) from SmartDeploy’s library of 1,500+ prebuilt, customizable driver packs.
Downloaded driver packages show up under Platform Packs view on the SmartDeploy console.
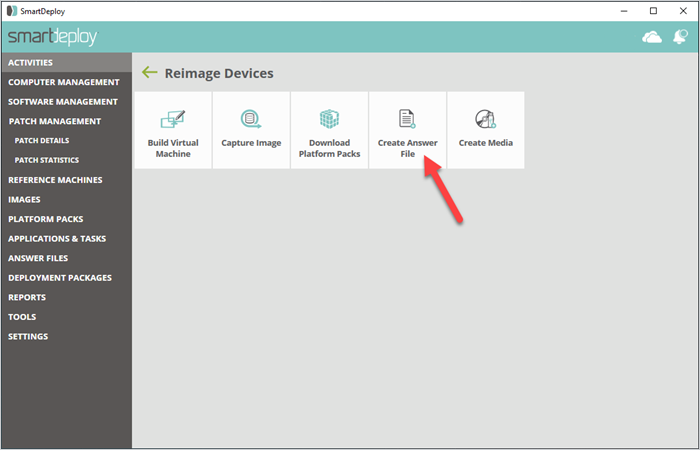
5. Create your answer file
Go to Activities > Reimage Devices > Create Answer File.
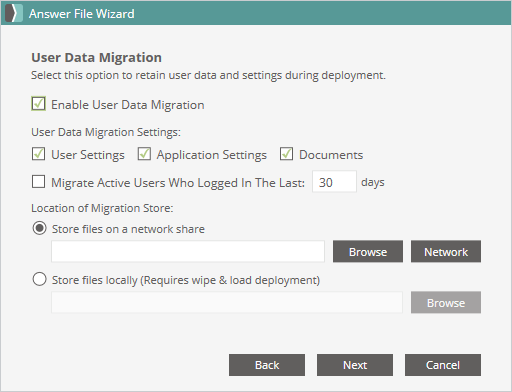
Via the Answer File Wizard, select your image source (local network or offline media, or cloud storage), add your network credentials, and select your Windows 11 image file and Platform Pack location.
For applications not captured with your image, you can slipstream prebuilt or custom Application Packs with your Windows 11 image for installation post-imaging.
To migrate user data, select Enable User Data Migration and configure your settings. (SmartDeploy comes with Microsoft’s User State Migration Tool (USMT) as an integrated feature.)
Configure your domain join settings.
Click Finish.
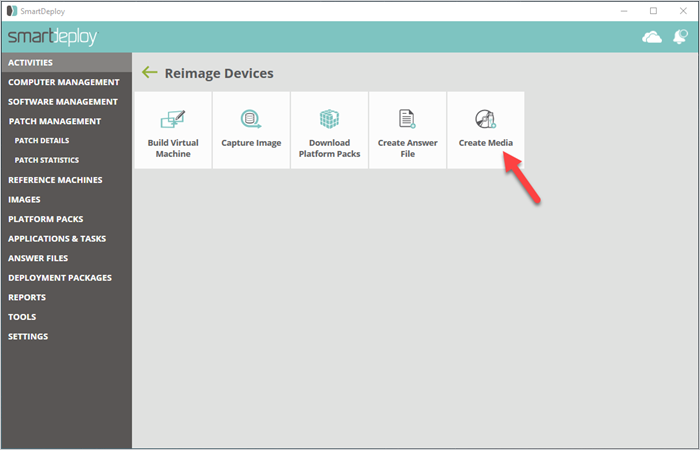
6. Create your boot media
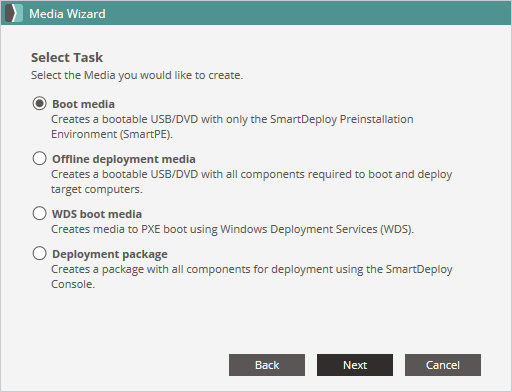
Go to Activities > Reimage Devices > Create Media.
Via the Media Wizard, select your deployment media to deploy Windows 11 via offline USB/DVD media, over a local network, or over the cloud (no VPN needed).
Select your deployment package, Platform Pack(s), and answer file. (You can select multiple answer files for deployment to different user or device groups.)
Name your deployment package and click Finish.
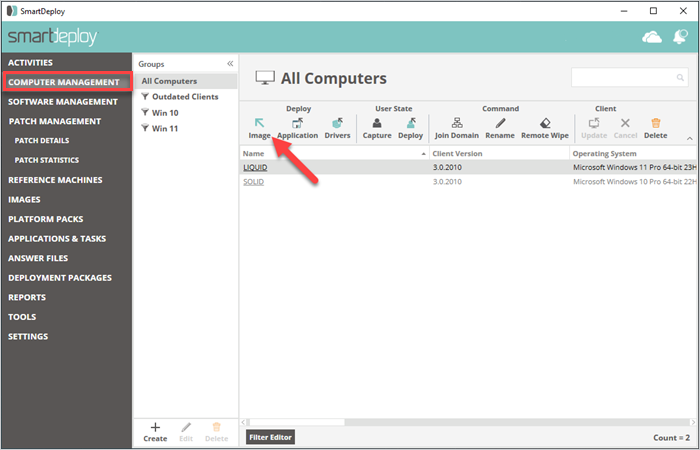
7. Deploy
Go to Computer Management.
Select the target devices or device group.
Under Deploy, click Image.
Select where you want to pull the image from, then select the deployment package you created earlier.
Optional: You can schedule your deployment for a specific date and time (preferably during off hours to minimize dramatic user meltdowns).
Hit Finish, and you’re off to the races.

Considerations when using file-based computer imaging software
For folks who are more familiar with conventional disk cloning tools, the thought of using a different kind of computer imaging software can feel disconcerting. But file-based computer imaging software can help sysadmins streamline their deployment workflows and maintain consistency across endpoints more efficiently and on a larger scale.
To find out exactly how you can make the move from Windows 10 to Windows 11 without losing sleep, try SmartDeploy free for 15 days or request a demo to learn more.