Scripts have become an essential part of a sysadmin’s device management toolkit. While scripts are useful, executing them against a remote machine isn’t always as easy as it should be. In this walkthrough, we’ll show you how a computer imaging tool with the right features can simplify remote script execution across your fleet.
With SmartDeploy, you can run your PowerShell, VBScript, and batch files against your Windows devices, no matter where they’re located. From simple one-liners to complex automation novellas with enough commands to make the host of the PowerShell Podcast blush, if you can imagine it, you can probably script it.
Important: In SmartDeploy, all Application Pack scripts are executed as the LOCALSYSTEM account and must be fully unattended — no user interaction required.
Download prebuilt script packages
SmartDeploy provides a selection of prebuilt script packages downloadable from the Application Pack Library. The packs are built and maintained by the SmartDeploy team and provide functionality such as shutting down computers, updating Group Policy, and activating Windows.
To download prebuilt script Application Packs:
In the SmartDeploy Console, click Applications & Tasks.
Click the + button, then click Download an Application Pack.

Enter script into the search bar, and press Enter on your keyboard to return only the script Application Packs.

Select the Application Pack you wish to download, then click Download. You can download as many Application Packs as you need. When finished, click Close.
Once you’ve downloaded the Application Packs, you will find them in your Applications & Tasks workspace.

How to create custom, automated PowerShell tasks
As its name implies, PowerShell is a very powerful and robust scripting language used to automate many IT management tasks. With PowerShell, sysadmins can interact with and manage almost every aspect of a Windows system. In the example below, we’ll show you how to create an Application Pack to deploy a prebuilt PowerShell Script (.ps1 file) called stop_chrome.ps1.
To build a custom PowerShell task in SmartDeploy:
In the SmartDeploy console, click Applications & Tasks.
Click the + button, then click Create an Application Pack.

At the welcome screen, click Next.
In the Folder Path field, enter the path or browse out to the folder containing the PowerShell script.
In the Executable Path field, enter the path or browse to the PowerShell script.

Click Next.
Enter your Application Pack details.
Change your Pack Type to Script, then click Next.

At the Installation Task window, a Command Preview is automatically generated, showing you the command as it'll actually be executed, passing it through powershell.exe with the -ExecutionPolicy Bypassargument added automatically. Review the command, add additional arguments if needed, then click Next.

A warning prompt will inform you that the Arguments field is empty if you do not add additional arguments. This is because most silent/unattended commands require additional arguments. In this case, because we are running a PowerShell script that we know will run silently, we don't need to add any arguments. Click Yes to proceed.

Review or set the installed product display name. Ensure Version check is unselected. The Version check setting is designed to limit applications from installing on endpoints that already have the application installed. Since we are deploying a PowerShell script and not installing an application, this setting is not applicable. Click Next.

Review the summary details, then click Next.

Click Finish.
Enter a file name for the Application Pack file, then click Save.

With the Application Pack saved, you'll find it in the Applications & Tasks workspace in the SmartDeploy console. This pack is now ready to be deployed and run against your remote endpoints, which we’ll cover in a later section.
How to create batch and VBScript tasks
If you prefer your scripts a little more old school, SmartDeploy has you covered as well. SmartDeploy can remotely execute your favorite batch and Visual Basic scripts on a remote machine as long as it runs fully unattended. The process is almost identical to creating a custom PowerShell Application Pack. Here’s how it works:
In the SmartDeploy console, click Applications & Tasks.
Click the + button, then click Create an Application Pack.
At the welcome screen, click Next.
In the Folder Path field, enter the path or browse out to the folder containing the batch or Visual Basic script.
In the Executable Path field, enter the path or browse to and select the script.
Click Next.
Enter your Application Pack details.
Change your Pack Type to Script, then click Next.
At the Installation Task window, a Command Preview is automatically generated, which shows you the command as it'll be executed.
Batch file commands should follow this command structure:
cmd.exe /c “[ApplicationsFolder]\Application Pack\Files\YourBatchScript.bat”
Visual Basic script commands should follow this command structure:
cscript.exe /b “[ApplicationsFolder]\Application Pack\Files\MyScript.vbs”
A warning prompt will inform you that the Arguments field is empty if you don't add additional arguments. This is because most silent/unattended commands do require additional arguments. In this case, because we are running a script that we know will run silently, we don't need to add any arguments. Click Yes to proceed.

Review or set the installed product display name. Ensure Version check is unselected. The Version check setting is designed to limit applications from installing on endpoints that already have the application installed. Since we are deploying a script and not installing an application, this setting is not applicable. Click Next.
Review the summary details, then click Next.
Click Finish.
Enter a file name for the Application Pack file, then click Save.
How to deploy script packs with SmartDeploy
Now that you've created your script packs, you can easily distribute them with SmartDeploy. Deploying script packs with SmartDeploy follows the same procedure as deploying an Application Pack. Here’s how it works:
In the SmartDeploy console window, click on the Computer Management link.

Click All Computers.

Select the remote computer you want to execute the script against, then click Deploy Application.

Select either Local Network or Cloud Network depending on the location of your device, then click Next.

Select the Application Packs or scripts you want to deploy, then use the arrow button to add them to the deployment.

Optionally, you can enable the user to defer the deployment and schedule it for a future date and time.
Click Next.
Enter the credentials necessary to access the selected file location, then click Finish.

Click OK when asked to confirm the application deployment.
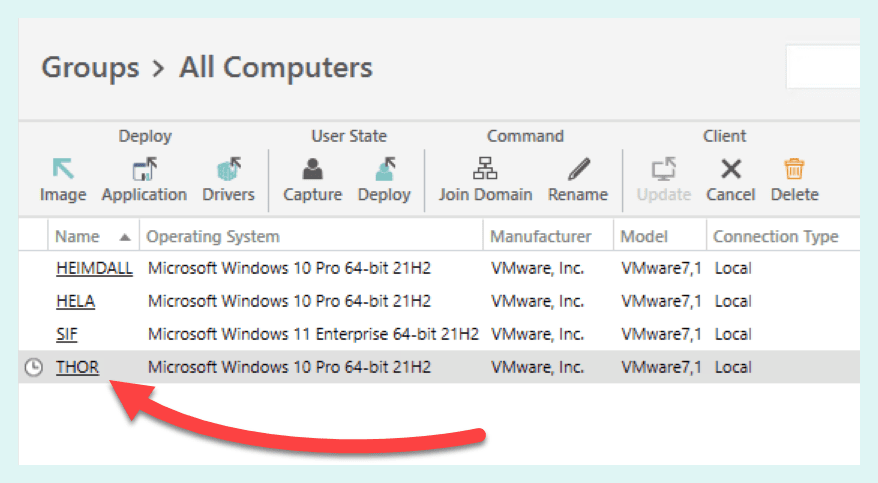
You can monitor the deployment status by clicking on the computer name of the remote device you deployed to.

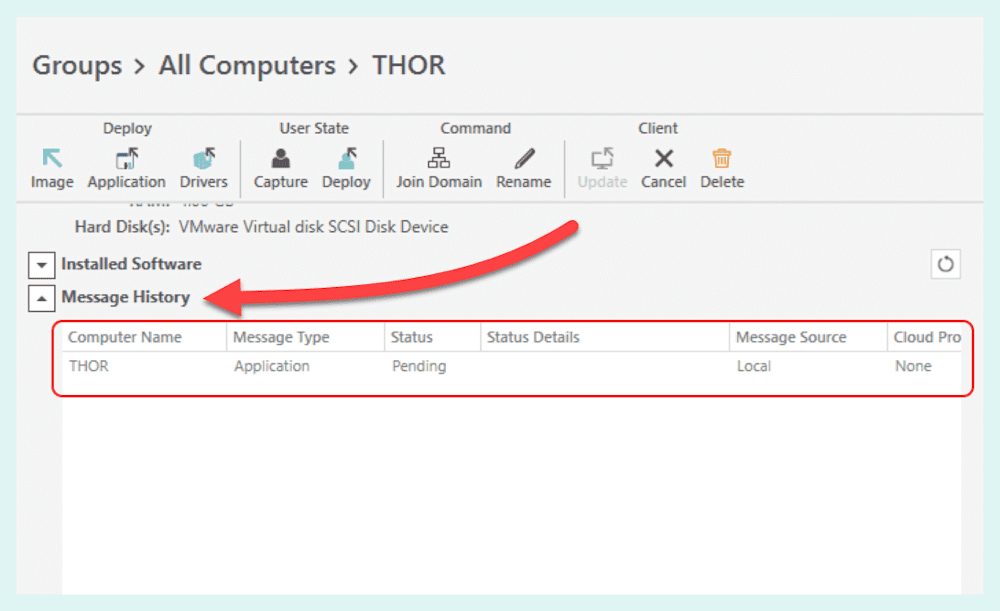
Inside the computer details windows, scroll down and expand Message History. Here, you’ll find the deployment status.

How to incorporate scripts into your image deployments
Scripts aren’t just great for devices already in production; they’re also handy when imaging computers. SmartDeploy can automate your script deployments during the imaging process, which gives you one less thing to worry about.
SmartDeploy offers two different ways to apply scripts to your image: Application Packs and postdeployment steps.
Let’s look at how to configure each option.
Application Packs
Adding existing Application Packs to an answer file is quick and easy with SmartDeploy. Just use the Answer File Wizard.
In the SmartDeploy console, click on the Activities link.
Click Reimage Devices.
Click Create Answer File to launch the Answer File Wizard.

With the Answer File Wizard open, advance through each screen, clicking Next to proceed until you reach the Application Packs window.

Select the app and script packs you want to add, then click the arrow (->) to add them to the answer file.

Click Next, and finishcreating the answer file.
Application and script packs that you include in this section of the answer file install and run after the Sysprep completes.
Postdeployment step
The next option is to save your scripts to your reference VM and then automate your scripts as a postdeployment step during the imaging process. This method gives you precise control over when your scripts execute during the imaging process.
Launch the Answer File Wizard by clicking on Activities > Reimage Devices > Create Answer File.
At the Answer File Wizard welcome window, click Advanced.

Click the Tasks tab.
Click Add.

Click the Phase drop-down menu, and select when you want the script to run. For help understanding the different phases, refer to the Answer File Tasks knowledge base.
In the Command line field, enter the command to run your script. It should resemble the commands we used earlier in this article. Here's the command I would use to run a PowerShell script saved on the reference VM at C:\Scripts:
powershell.exe -ExecutionPolicy Bypass -file "C:\Scripts\MyScript.ps1"
Click OK when finished.
With your tasks added, finish running through the Answer File Wizard to complete the process. The resulting answer file is ready to automate your script executions during your future image deployments.
Running scripts gives sysadmins the flexibility and ability to carry out many administrative tasks more effectively. But running scripts against a remote computer (and during imaging no less) can be challenging — especially when users are spread across multiple locations. SmartDeploy can help clear your roadblocks, allowing you to execute scripts on endpoints wherever they are. Take SmartDeploy for a test drive today, and see how it can simplify your device management workflows.


