
Reimaging multiple computers in one go can be tricky at the best of times. When you have to reimage different hardware models or dozens of endpoints across various locations, things can get wild. We’ll walk through key areas to consider and how a multifunctional Windows imaging tool with the right mix of features can take the pain out of the process.
From hardware rollouts to Windows migrations, reimaging scenarios vary greatly and are often complicated. (Let’s be honest, sysadmins are a hardy bunch, but they aren’t in IT for the thrill of troubleshooting.) The more variables there are, the more versatile your computer imaging tool needs to be.
What to consider when reimaging multiple computers
Before getting started, it’s important to consider the following factors when planning your reimaging process (and supply of caffeinated drinks).
The reimaging scenario
Are you rolling out new hardware or reimaging existing machines? Are devices on-site or remote?
Hardware diversity
Are you reimaging the same or different hardware models? Are file-based or sector-based imaging tools more useful?
Number of devices
How many machines are you reimaging at a time?
User state migration
Are you migrating user data and settings as part of the reimaging process?
One of the main challenges when reimaging multiple devices is finding an efficient way to deliver images to target machines, wherever they may be. (Nothing says fun like having to manually reinstall Windows on 50 machines in 5 different locations.) With so many variables to consider, IT teams need a computer imaging tool with the flexibility to support a variety of common scenarios.
How to reimage multiple computers with SmartDeploy
For Windows admins, SmartDeploy makes reimaging multiple computers easier — especially if you’re supporting diverse hardware or a distributed fleet.
You can create hardware-independent OS images that can be applied to any Windows PC. In the same deployment, you can slipstream prebuilt driver packs (Platform Packs) with your operating system image to different device models — and deploy using a USB flash drive, a local network, or the cloud.
We’ll walk you through the reimaging process below.
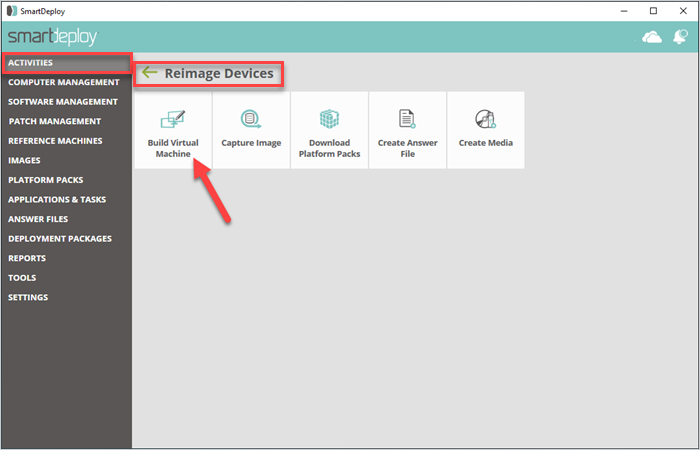
1. Create your reference computer
If you use Oracle VM VirtualBox or VMWare, you can build your reference computer via SmartDeploy’s Build Wizard.
Via the SmartDeploy console, go to Activities > Reimage Devices > Build Virtual Machine.
If you’re using Microsoft Hyper-V, Citrix, XenServer, or VMWare ESXi, you’d have to build your reference computer on the virtualization platform itself.
Why use virtual machines?
Virtual machines cost less, take up less space, and are easier to maintain than physical reference computers. As your fleet grows in size and hardware diversity, virtual machines also allow you to scale your reimaging process more easily.
2. Install Windows on your reference computer
Install Windows and run Windows updates on your virtual reference computer.
Install core apps that you want on all target devices.
When done, power down your virtual machine.
Don’t install antivirus software on your golden image
Don’t install antivirus software on your reference computer when building your golden image. You can do that post-imaging. Antivirus and other third-party security software can mess up critical utilities, like Sysprep, on a Windows operating system.
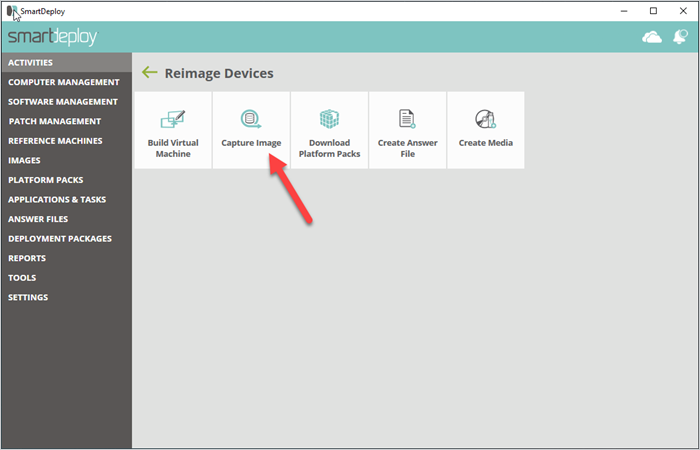
3. Capture your system image
Go to Activities > Reimage Devices > Capture image.
Select and scan your virtual hard disk.
Select a name and location for your .WIM file.
Click Finish.
Side note: SmartDeploy runs Sysprep automatically at deployment time, so you don’t have to do that here. #ITproductivityhacks
4. Download prebuilt driver packs
Go to Activities > Reimage Devices > Download Platform Packs.
Select the model-specific Platform Packs you need and hit Download.

During deployment, SmartDeploy will install the correct drivers for each target device.
Downloaded Platform Packs show up under the Platform Packs tab in the console — and they’re customizable. You don’t have to manage or update these driver packages since SmartDeploy’s technicians take care of that. (We can tell you’re devastated.)
How to update drivers or BIOS in Windows devices
Learn how you can also use SmartDeploy to simplify driver updates or BIOS updates in Windows devices.
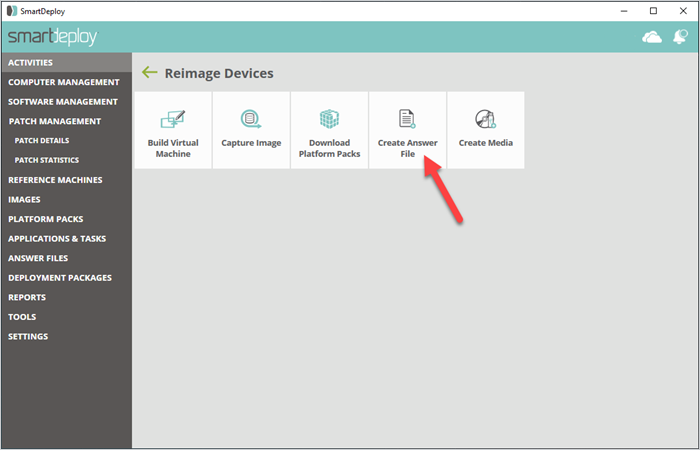
5. Create your answer file
Go to Activities > Reimage Devices > Create Answer File.
Launch the Answer File Wizard.
Select your image source, insert network credentials, and select your .wim file and Platform Pack location.
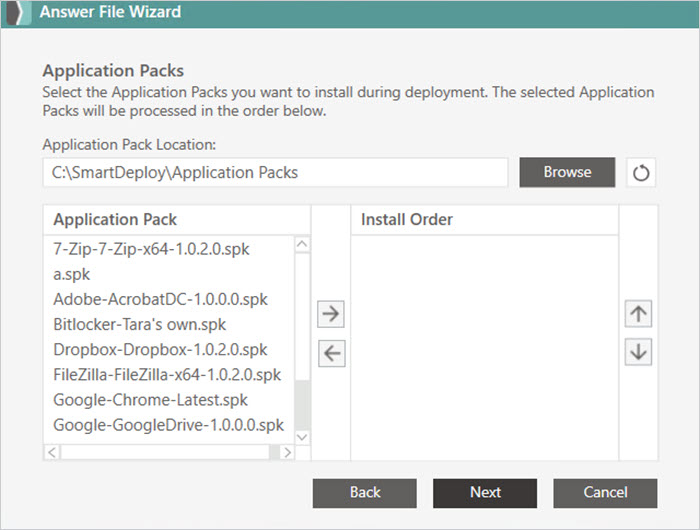
Select any Application Packs you want to include.
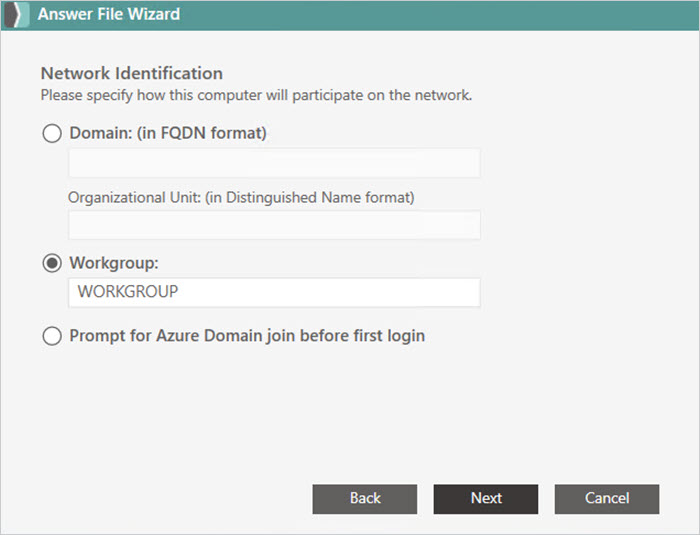
Configure domain join settings.
When you’re done, click Finish.
Application Packs
For applications not baked into your golden image, you can slipstream Application Packs in your answer file — automatically installing them on the target computer after deployment.
Multiple answer files
If you’re reimaging distinct groups of machines that need their own specialized apps, create an answer file for each group. You can add multiple answer files to your deployment media and deploy them at the same time.
User state migration
Your CEO might be weirdly sentimental about their screen saver collection. If so, you can use the integrated User State Migration Tool (USMT) feature in SmartDeploy to migrate user data and settings while reimaging their computer. Crisis averted.
Reimaging devices over the cloud
SmartDeploy also allows you to connect to your business cloud storage provider and create a cloud-connected answer file for deployments over the internet without requiring a VPN.
6. Create your boot media
Go to Activities > Reimage Devices > Create Media.
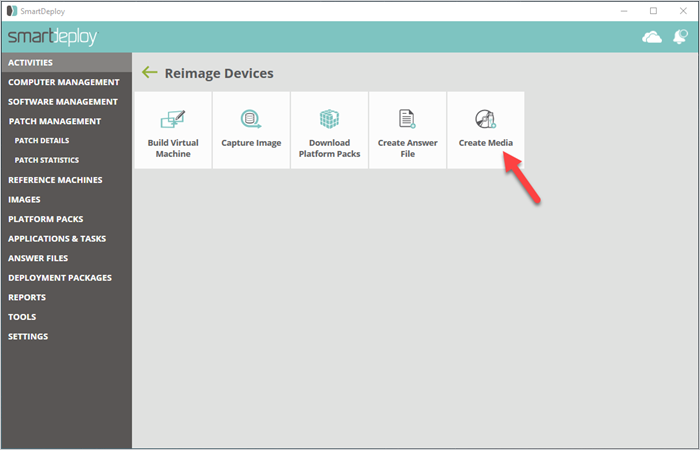
Select your deployment media.
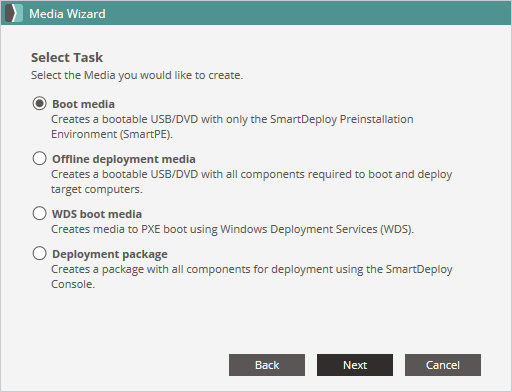
Select your deployment package, Platform Packs, and answer file(s). You can include multiple answer files here.
Name your deployment package, then click Finish.
7. Deploy your image
Go to Computer Management.
Select the target devices or device group.
Click Image.
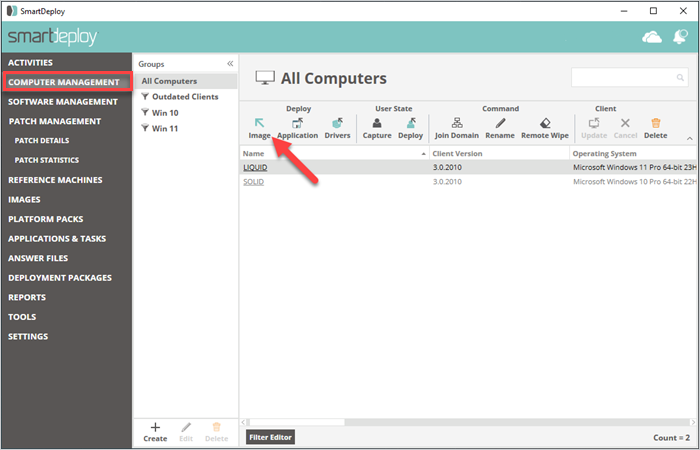
Select your deployment package.
Option: Set your deployment schedule.

Click Finish.
With SmartDeploy’s built-in features, you can deploy Windows OS images in small batches or larger waves, whether you’re supporting users in air-gapped environments, local networks, or exotic far-flung locations. No need for tedious tinkering.
How to reimage multiple computers FAQs
What’s the difference between a factory reset and reimaging a computer?
A factory reset restores a computer to its default OEM state or factory settings. In contrast, reimaging a computer means applying a custom operating system image with selected files, apps, and settings to the device.
What’s the difference between a system backup and a system image?
A system backup is typically used in recovery scenarios, restoring a device to a particular state when the backup image was captured. A system image is more broadly defined as an operating system environment with specific configurations that you want to distribute to one or more devices.
Explore SmartDeploy’s full range of reimaging features and functionalities with a free 15-day trial.