When deploying an image to a new end user’s device, it’s important to have a plan for migrating their data to get them back to productivity as quick as possible. SmartDeploy imaging software now integrates with the Microsoft User State Migration Tool (USMT) to make imaging and migrating user data to a user’s new device very straightforward.
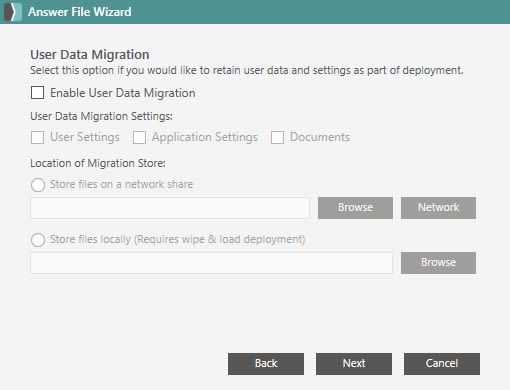
We call this integration feature User Data Migration which is essentially a wrapper around USMT. The interface is easy-to-use and fits seamlessly into the SmartDeploy process. Specifically, it is housed in the User Data Migration page of the Answer File Wizard. Of course, using this feature is optional. If you just want to provision a new device and not worry about bringing over any user data, you can skip this page in the Answer File Wizard.

Two parts to the User State Migration Tool
Before we begin, it would be good to have a base understanding of how USMT works. There are two parts to USMT: ScanState and LoadState.
ScanState will check the files and registry and build a migration store file (*.mig) that contains all the user’s data and settings based upon the options selected. You have some choices on what to include and where you want to store the .mig file.
LoadState will then take the migration store file and apply the user’s data and settings to the operating system on your user’s device.
Your Windows 10 exit strategy
Windows 10 end of life is coming quickly! Join our free webinar to get expert advice on upgrade options, extended support, and what it all means for your team. Bring your questions — we've got answers!
How to migrate user data with SmartDeploy
As previously mentioned, we’ve built what is normally a fairly complicated tool into a very simple process. Let’s walk through the steps of enabling USMT to migrate your end user data. These steps assume that you’ve already built and captured your golden image with SmartDeploy.
Launch Answer File Wizard from the SmartDeploy Console.
Select the settings and image for the deployment until you reach the User Data Migration page.
Check the box to Enable User Data Migration.
Under User Data Migration Settings, check the box(es) for the data you want to migrate:
User Settings: User folders, settings, and documents (C:\Users\…)
Application Settings: Settings for commonly used Microsoft and other software
Documents: Additional files on the C: drive that are not operating systems files or applications
Note: A more detailed list of what is migrated is available here.
Select the Location of Migration Store:
Store files on a network share: Store your .mig file to a server on the network. The .mig file will be automatically downloaded back to your device after the operating system has been deployed.
Store files locally (Requires wipe & load deployment): Store your .mig file in the specified folder of the machine you are deploying. The wipe & load option will maintain the current partition structure, deleting all data from the disk except the folder selected as the migration store. Note: Wipe & load requires that the partition structure of the image matches the current partition structure of the device (e.g. do not use wipe & load when migrating from Windows 7 to Windows 10 due to the difference in System partition sizes).
Complete the rest of the Answer File Wizard and save.
When using an Answer File with USMT enabled during deployment (in SmartPE), ScanState will run before the disk is provisioned. If the migration store file is saved to a network location, the file will be downloaded back after the image is deployed. LoadState will occur once the machine boots back up into Windows. Currently, there is no interface to display the LoadState progress, but a log can be found at C:\Windows\Temp\LoadState.log. Avoid rebooting the machine until LoadState.exe completes (you can check Task Manager > Processes to check if it is still running).
Advanced options for USMT power users
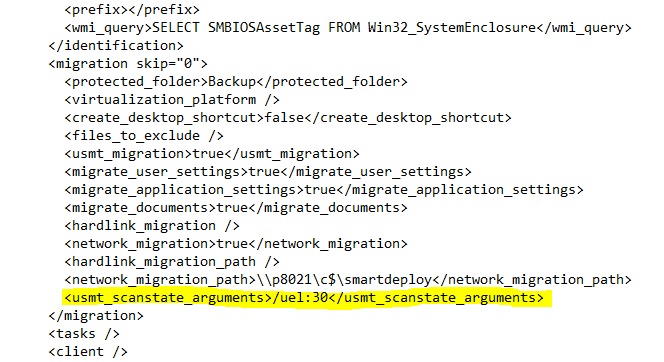
If you are a USMT power user and the default settings for USMT are not sufficient for your needs, you can add additional arguments to the ScanState or LoadState commands to explicitly include or exclude information as part of your data migration. This is usually done for reasons like excluding large files that you don’t want to take the time or storage to migrate. To do this, you will need to edit the Answer File directly:
Open your Answer File in a text editor.
Locate the <migration> node.
Add a child <usmt_scanstate_arguments> or <usmt_loadstate_arguments>.
Add your argument and then close the child (e.g. <usmt_scanstate_arguments>/uel:30</usmt_scanstate_arguments>). This particular example will only capture users that have logged in within the last 30 days.

Whether you're planning for Windows migration or replacing user devices, using SmartDeploy to migrate user data can help streamline your workflows and save you a ton of time. Try it free for 15 days to see how you can use it to manage your Windows devices more efficiently.


